


We are hackers and developers and I believe we could use this space to write not only about our stickers but also about more interesting and general computer science topics.
I had the chance to study both the internals of compilers and the internals of processors. These two topics are quite related and often overlooked in a world of high level languages and distributed computation. What a shame!
One of the most interesting topics about compilers is Static Single Assignment, SSA, and the Phy function.
Before to dive into the rabbit hole we need some context.
The role of a compiler is to translate high level languange to binary code that a processor can understand and execute.
Binary instructions looks like this:
ADD  $R1 $R2 $R1 <- R1 = R2 + R1
ADDI $R3 $R3 5   <- R3 = R3 + 5
MOVE $R4 $R5     <- R4 = R5
The compiler need to map each variable used in the program to a register where the processor can actually work.
To make things clearer here is a very small snippet of code and a possible translation.
a = 1;
a = a + 3;
b = a + a;
c = b + a;
c = c + 1;
Which will roughly translate to:
ADDI $R1 $zero 1    # a = 1;
ADDI $R1 $R1 3      # a = a + 3;
ADD  $R2 $R1 $R1    # b = a + a;
ADD  $R3 $R2 $R1    # c = b + a;
ADDI $R3 $R3 1      # c = c + 1;
Now, this is where SSA enters in action.
Keep track of the variables and the registers is quite complex and the compiler uses a clever strategy. The above pseudo code get translated into this semantic equivalent code.
a0 = 1;
a1 = a0 + 3;
b0 = a1 + a1;
c0 = b0 + a1;
c1 = c0 + 1;
Variables don’t get mutated anymore, but a new variable is defined every time. Similarly when the value of a variable is needed we use the last definition of variable.
This way is simpler for the compiler to allocate registers. Moreover unrelated use of the same variable is no more an issue.
The above code will compile to something like this:
ADDI $R1 $zero 1    # a0 = 1;
ADDI $R2 $R1 3      # a1 = a0 + 3;
ADD  $R3 $R2 $R2    # b0 = a1 + a1;
ADD  $R4 $R3 $R2    # c0 = b0 + a1;
ADDI $R5 $R4 1      # c1 = c0 + 1;
This works extremely well for sequential code, however most code is not sequential and control flow structures are always present.
Let us consider what happens if our code looks like this:
a = 1;
a = a + 3;
b = a + a;
if (b > 3):
    c = 2;
else:
    c = a;
    c = c + 3;

c = c + 1;
By applying the SSA we will immediately see the issues.
a0 = 1;
a1 = a0 + 3;
b0 = a1 + a1;
if (b0 > 3):
    c0 = 2;
else:
    c1 = a;
    c2 = c1 + 3;

c3 = c??? + 1; <--- PROBLEM HERE
What should be c???, c0 or c2? The answer depends on the value of b0 that may be determined at run time.
(Clearly our case is trivial, but let us immagine a more complex control flow.)
To reason about this issues we need more powerful tools, so let’s introduces the Basics Blocks (BB) that are the building structures for the Graph Control Flow (CGF).
Finally we will introduce the Phy function that will allow us to complete the above snippet like this:
c3 = Phy(c0, c1);
c4 = c3 + 1;
The problem we are trying to solve is where to call the Phy function. In the snippet above this is trivial, but in more complex softwaresn this is a real issue.
A basic block is a series of statements without jumps or labels in the middle.
So a basic block starts with a label, it ends with a (conditional) jump and there are no jumps or labels in the middle.
Here is an example of a Basic Block:
label_enter:
ADDI $R1 $zero 1    # a0 = 1;
ADDI $R2 $R1 3      # a1 = a0 + 3;
ADD  $R3 $R2 $R2    # b0 = a1 + a1;

SUBI $R4 $R3 3      # check = b0 - 3;
JEQ  $R4 label1     # jump to label1 if check == 0
It start with a label where you may jump in, it finish with a conditional jump.
Indeed the following snippet is not a basic block, it has a conditional jump on line 2 and a label inside its body.
SUBI $R4 $R3 3      # check = b - 3;
JEQ  $R4 label1     # jump to label1 if check == 0
ADDI $R5 $R2 $zero  # c = a;

label2:
ADDI $R6 $R5 1      # c = c + 1
JUMP label_exit     # exit
Now we can go ahead and understand the concept of Control Flow Graph.
Let’s start again we our snippet of code.
The Phy function simply returns the correct value to use. For now lets use it without knowing how it is actually implemented nor why it is called there.
a0 = 1;
a1 = a0 + 3;
b0 = a1 + a1;
if (b0 == 3):
    c0 = 2;
else:
    c1 = a1;
    c2 = c1 + 3;

c3 = Phy(c0, c2);
c4 = c3 + 1;
Now let’s try to translate this making use of the PHY operator.
label_enter:
ADDI $R1 $zero 1    # a0 = 1;
ADDI $R2 $R1 3      # a1 = a0 + 3;
ADD  $R3 $R2 $R2    # b0 = a1 + a1;
SUBI $R4 $R3 3      # check = b - 3;
JNEQ $R4 not_taken  # if check != 0 go to label not_taken

taken:
ADDI $R5 $zero 2    # c0 = 2;
JP label_1          # go to label_1

not_taken:
ADDI $R6 $zero $R2  # c1 = a1
ADDI $R7 $R6 3      # c2 = c1 + 3
JP label_1          # go to label_1

label_1:
PHY  $R8 $R5 $R7    # c3 = Phy(c0, c2)
ADDI $R9 $R8 1      # c4 = c3 + 1
JP label_exit
Let’s build the control flow graph for such structure.
The CFG is a graph having the basic blocks as the nodes and the jumps as the edges.
It will look pretty much like this
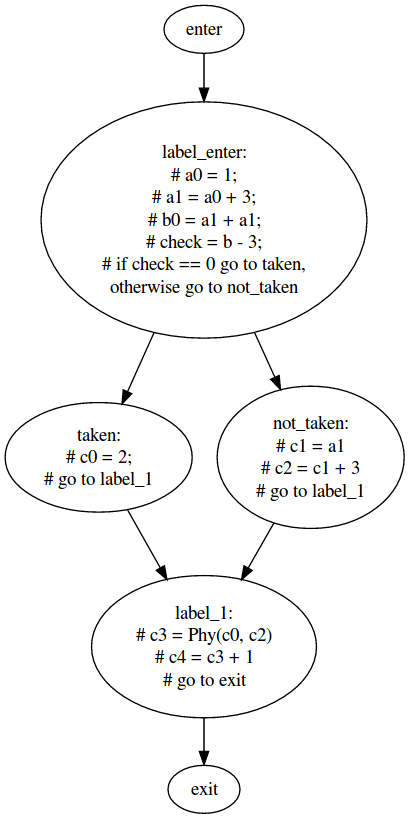
With this visualization we are making the problem of where to put the Phy function clearer.
There are two basic blocks where c is defined and both of them converge to the same block where c is used.
More formally the procedure to find where to put our Phy function is an iterative procedure similar to the following.
While:
Insert a Phy function at the beginning of z.
Where P(a->b) denotes the path of nodes from node a to node b.
Also note that this is an iterative procedure: inserting a Phy function implies the definition of a new variable, thus the algorithm needs to be repeated untill we reach a fixed point when no new Phy functions are needed.
Clearly the Phy function is not a processor instruction nor it is a procedure that can be called, so how do we deal with it?
The implementation is quite clever.
Simply put a MOVE instruction as last instruction in the basic blocks that jump where a Phy function is used.
Overall the new compiled code will look like this:
label_enter:
ADDI $R1 $zero 1    # a0 = 1;
ADDI $R2 $R1 3      # a1 = a0 + 3;
ADD  $R3 $R2 $R2    # b0 = a1 + a1;
SUBI $R4 $R3 3      # check = b - 3;
JNEQ $R4 not_taken  # if check != 0 go to label not_taken

taken:
ADDI $R5 $zero 2    # c0 = 2;
MOVE $R8 $R5        # c3 = c0; <-- here added the MOVE
JP label_1          # go to label_1

not_taken:
ADDI $R6 $zero $R2  # c1 = a1
ADDI $R7 $R6 3      # c2 = c1 + 3
MOVE $R8 $R7        # c3 = c2; <-- here added the MOVE
JP label_1          # go to label_1

label_1:                       <-- here removed the PHY
ADDI $R9 $R8 1      # c4 = c3 + 1
JP label_exit
This way the classic flow execution will produce the expected behaviour and we are still able to use the Static Single Assignment.
This write up is very simplicist and a lot of details are being ommited.
However I hope to have shared what I believe is a quite interesting process.
Happy Hacking!
Free worlwide shipping with any order of our hex stickers
Up to 5 stickers 7.99€
Up to 10 stickers 9.99€
Up to 15 stickers 13.99€
Up to 20 stickers 15.99€


| Sticker | Quantity |
|---|
Or pay via PayPal sending directly the money to hexstickers@gmail.com along with what stickers you want and your mail address
We will confirm your order as soon as we get it. If you have any problem just contact us.
DEVs, what you LOVE? Show it with our Stickers! Free stickers with any order if you retweet! https://t.co/8brqkqaGsK pic.twitter.com/x0UhPwvs3S
— WallOfStickers (@WallOfStickers) March 27, 2017
If you need more than 20 stickers, or you have any other needs, please contact us hexstickers@gmail.com
For any inquiries, requests or suggestions the fastest way to reach us is still via email hexstickers@gmail.com
We will send an email when we ship your order, usually it takes take 2 working days, and at the most 5.
The stickers are shipped from Europe thus it will take approximately 10/14 days to reach the US and one week in Europe.
All the sticker are compliant to the specifications so that you can freely mix ours with the ones from other vendors.
All product names, logos, and brands are property of their respective owners. All company, product and service names used in this website are for identification purposes only. Use of these names, logos, and brands does not imply endorsement.